Are you looking to get started with WhatsApp marketing for your business and send bulk WhatsApp messages to your customers? To reach out to your customers at scale, WhatsApp can prove to be the best medium, even more efficient than email or any other communication channels out there.
In this article, we’ll show you how you can send bulk broadcast messages on WhatsApp to your customers, the right way, using the official WhatsApp Business API and our bulk WhatsApp message sender, WANotifier.
Introduction to WhatsApp Bulk Messaging
Bulk messaging marketing messages on WhatsApp is a powerful way for businesses to reach out to a large number of recipients simultaneously. This is particularly useful for sending promotional offers, festive deals, and other mass marketing campaigns. By leveraging WhatsApp’s global reach with over 3 billion users and its high engagement rates, businesses can ensure their messages are seen and they get the ROI they expect.
What is Bulk Messaging on WhatsApp?
WhatsApp bulk messaging refers to the process of sending a single message to a large number of recipients at once. Unlike traditional one-on-one messaging, bulk messaging allows businesses to reach a large audience in one go. This can be achieved through an official channel like WhatsApp Business API, which enables automated and scalable sending of WhatsApp messages.
Benefits of WhatsApp Bulk Messaging
Sending messages in bulk to your customers on WhatsApp has many benefits, making it one of the most lucrative personal messaging marketing channels for most businesses. Here are some key advantages:
- Efficiency: Sending messages in bulk saves time and effort compared to individual messaging. This allows businesses to focus on other important tasks.
- Wide Reach: With over 3 billion users worldwide, WhatsApp provides an unparalleled platform for reaching a global audience.
- High Engagement: Users on average open WhatsApp 25+ times a day. That means your messages will have a high open rate, and it’ll actually be seen and read by your target audience.
- Cost-Effective: Although WhatsApp API is paid, and you need to pay a small charge for each message you send using the API, the ROI far exceeds the cost as compared to other channels.
- Personalization: WhatsApp Business API allows you to personalize each and every message you send, enhancing customer experience and engagement.
Now, let’s understand what the WhatsApp API is exactly and why we need that for sending these bulk broadcast messages.
WhatsApp Business App vs WhatsApp API
WhatsApp provides two different options for businesses to communicate with their customers.
1. WhatsApp Business App
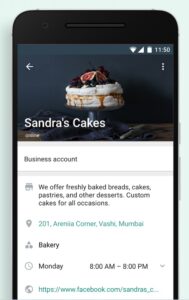
The first option is the WhatsApp Business mobile app that you might have already experienced. WhatsApp provides an app for businesses in which you can set up your business account and communicate with your customers as a business. This app is different from the standard WhatsApp app and comes with a unique set of features targeted towards businesses.
WhatsApp business mobile app is best suited for small-scale use when you do not have to send bulk messages or integrate WhatsApp with your site to send automated messages. For such advanced use cases, WhatsApp provides the Cloud API.
2. WhatsApp API
WhatsApp API is a paid API. You need to pay a small per-conversation fees to them to send messages using their API.
To use WhatsApp API, you need to know how to code or hire a developer to integrate it for you, and it is not as straightforward as installing an app on your phone.
But you don’t have to worry about coding and all the technicalities to use the API, as we’ve got you covered!
Though the WhatsApp Business mobile app is great for general communication, it can be restrictive if you want to do more advanced things like sending messages to thousands of contacts at once, running campaigns & tracking performance of messages you send, sending notification messages from your website for things like order confirmation, and many similar advanced use cases.
For such scenarios, WhatsApp launched WhatsApp Business API also known as WhatsApp Business API, which you can use to programmatically send WhatsApp messages.
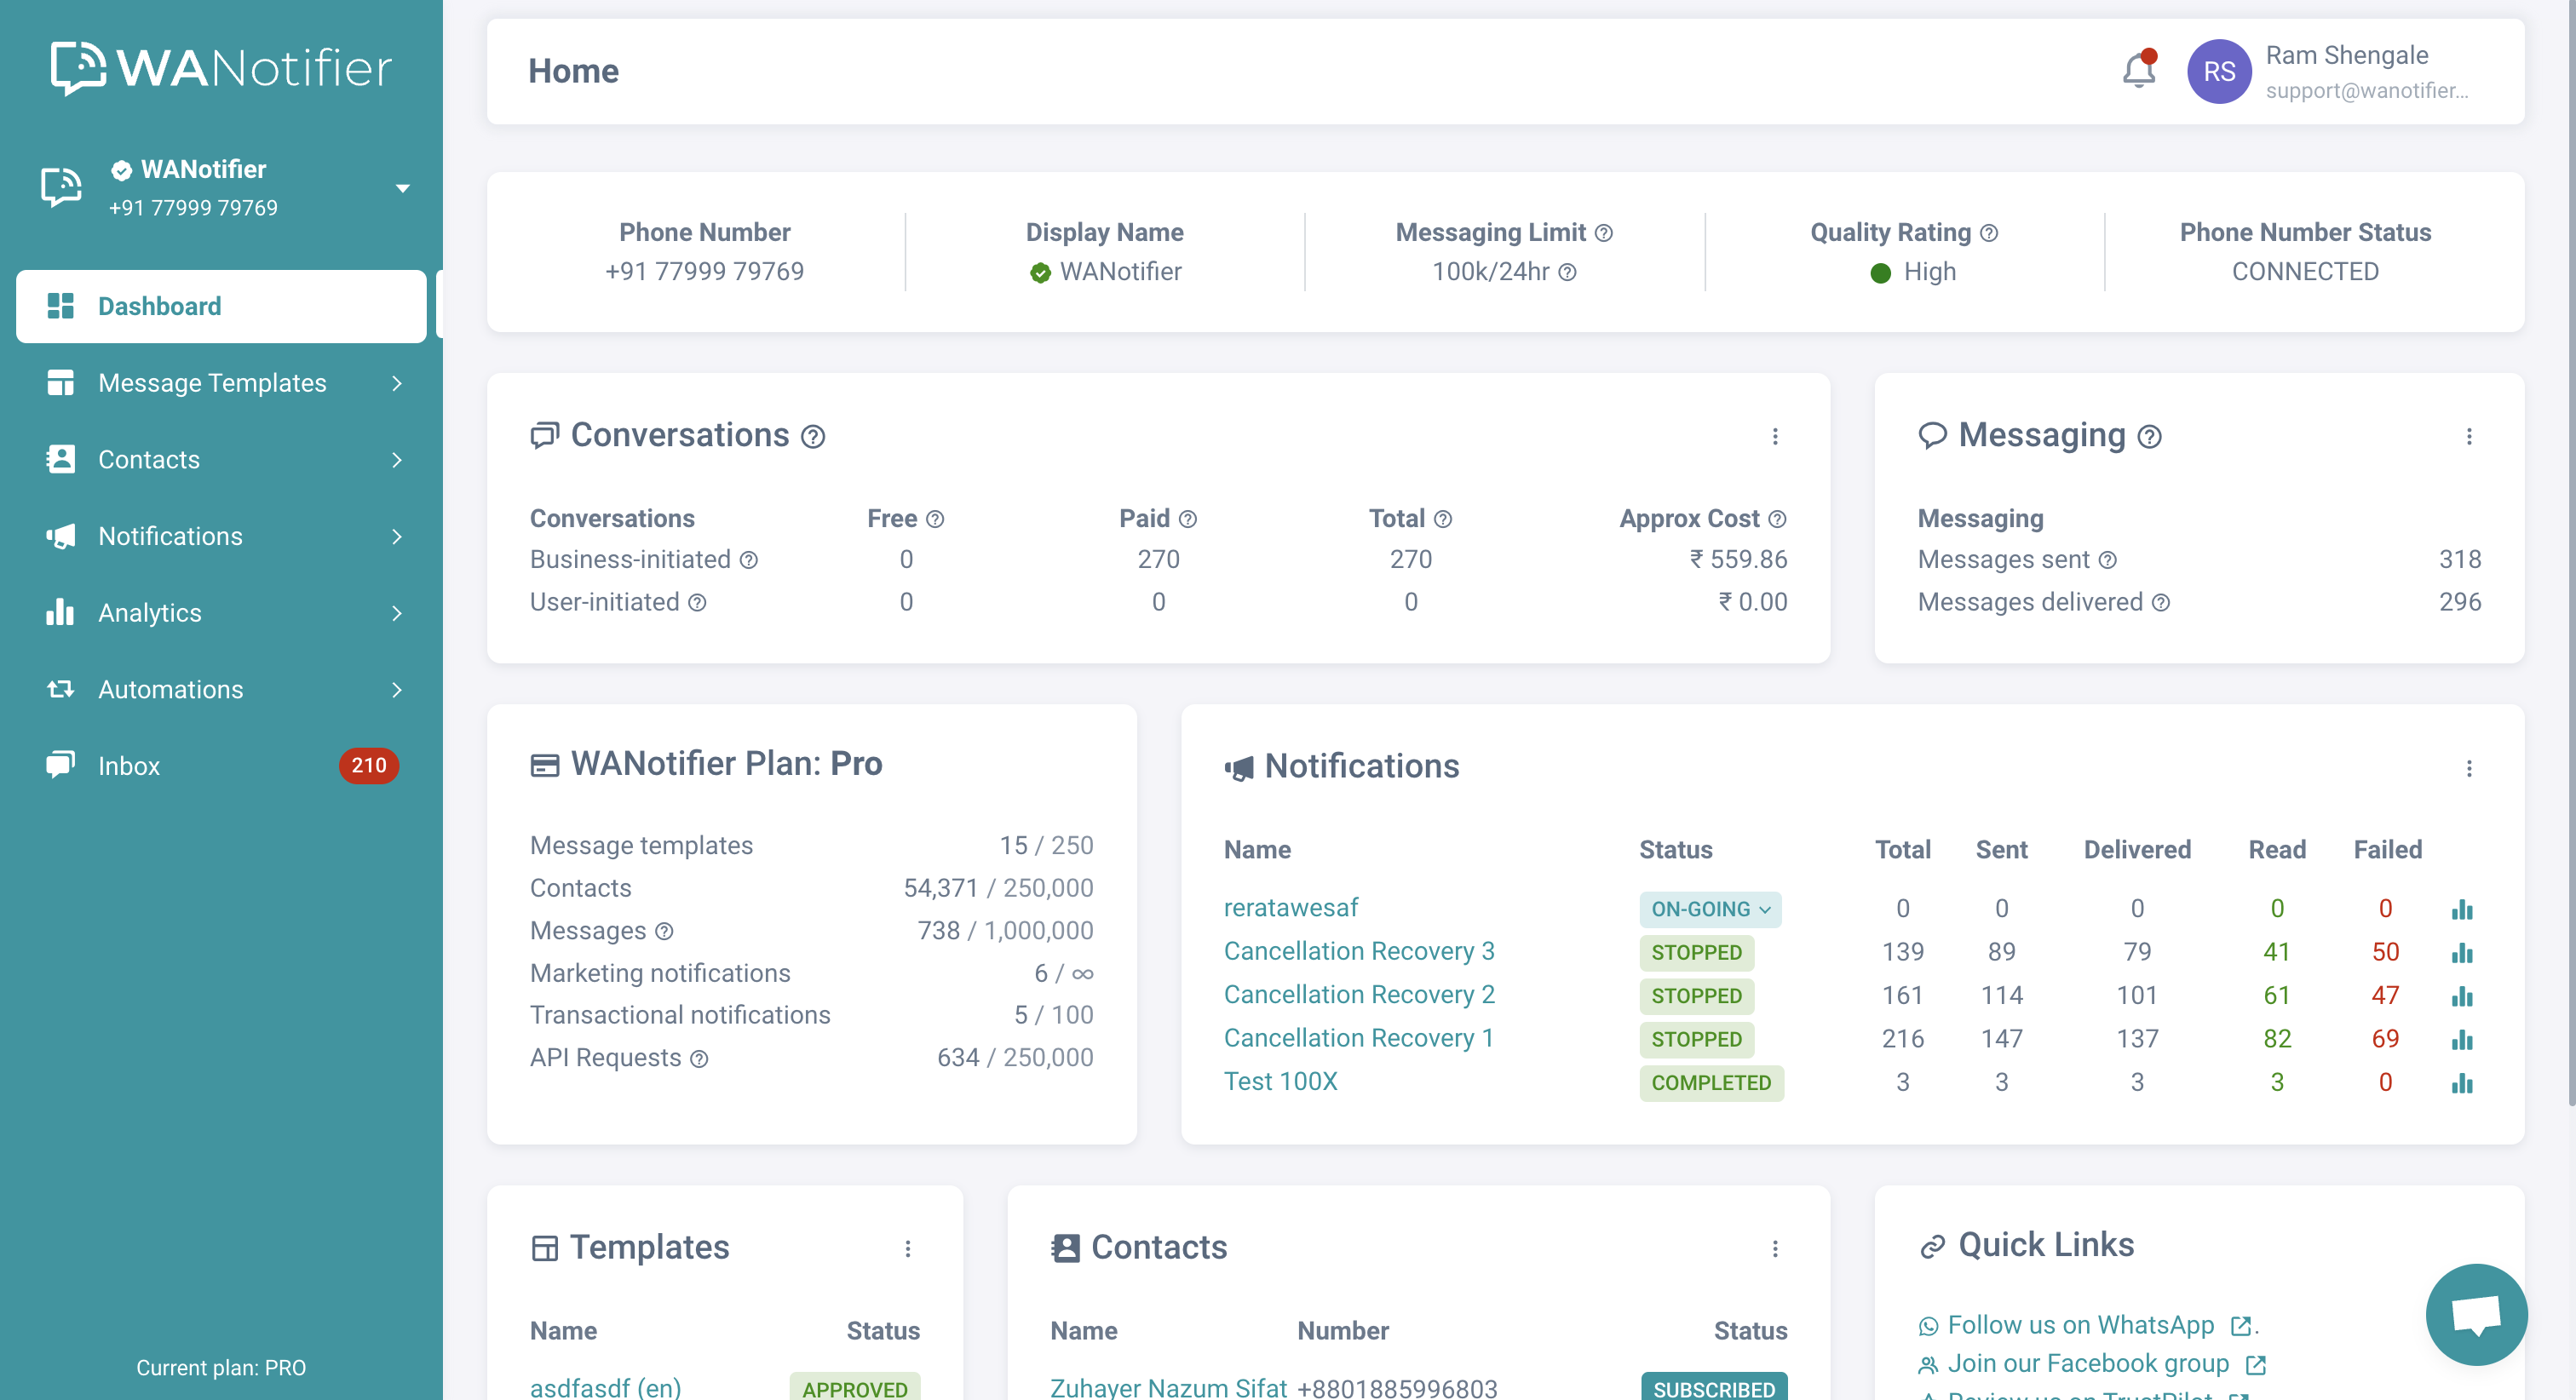
Enter WANotifier: The Ultimate WhatsApp Broadcast Tool
You can start using WhatsApp API for your business with no coding knowledge required, using our tool WANotifier.
WANotifier is a WhatsApp marketing and automation platform built on top of the official WhatsApp API that lets you send and receive WhatsApp messages through the API. All you need to do is set up your phone number with WhatsApp API, and you’re ready to go!
Here’s everything you can do with WANotifier:
- Send bulk WhatsApp messages to thousands of contacts at once.
- Send transactional notification messages from your website when a certain action is performed. This may include things like new order placement, form submission, and so on.
- Integrate and send WhatsApp notifications from 3rd party apps using REST API integrations.
- View detailed analytics and track the performance of your notification messages to know how many contacts are opening and reading your messages.
- Set up automations and chatbots to do 24/7 hands-free communication with your customers.
- Send and receive messages from a centralized Inbox.
- And much more.
There’s a lot more you can do with WANotifier. You can check out all the features it provides on this page. Now that you know how powerful WANotifier is, let’s look at how you can use it to send bulk WhatsApp messages using it.
Connect your number to the WhatsApp API with WANotifier and reach thousand of contacts in one go!
How to Send Bulk Messages on WhatsApp?
Here’s how you can start sending bulk WhatsApp messages to your customers in 4 simple steps.
Step 1 – Set Up Your Phone Number with Official WhatsApp API
The first step is to connect your phone number with the WhatsApp API by creating an account with WANotifier.
You need to have a spare phone number available to set up with your phone number with the API. Also, WhatsApp requires you to have a website and have a registered business with some kind of government documents so that they can allow you to use their API.
You can read our detailed article on how to set up your phone number with WANotifier and WhatsApp API to get started on the page:
>> How to Create your WANotifier Account and Set Up API?
After your WANotifier account is ready with WhatsApp API setup, you’ll be redirected to your dashboard. Once you’re there, you are ready to move to the next step.
Step 2 – Create a Message Template & Get It Approved by WhatsApp
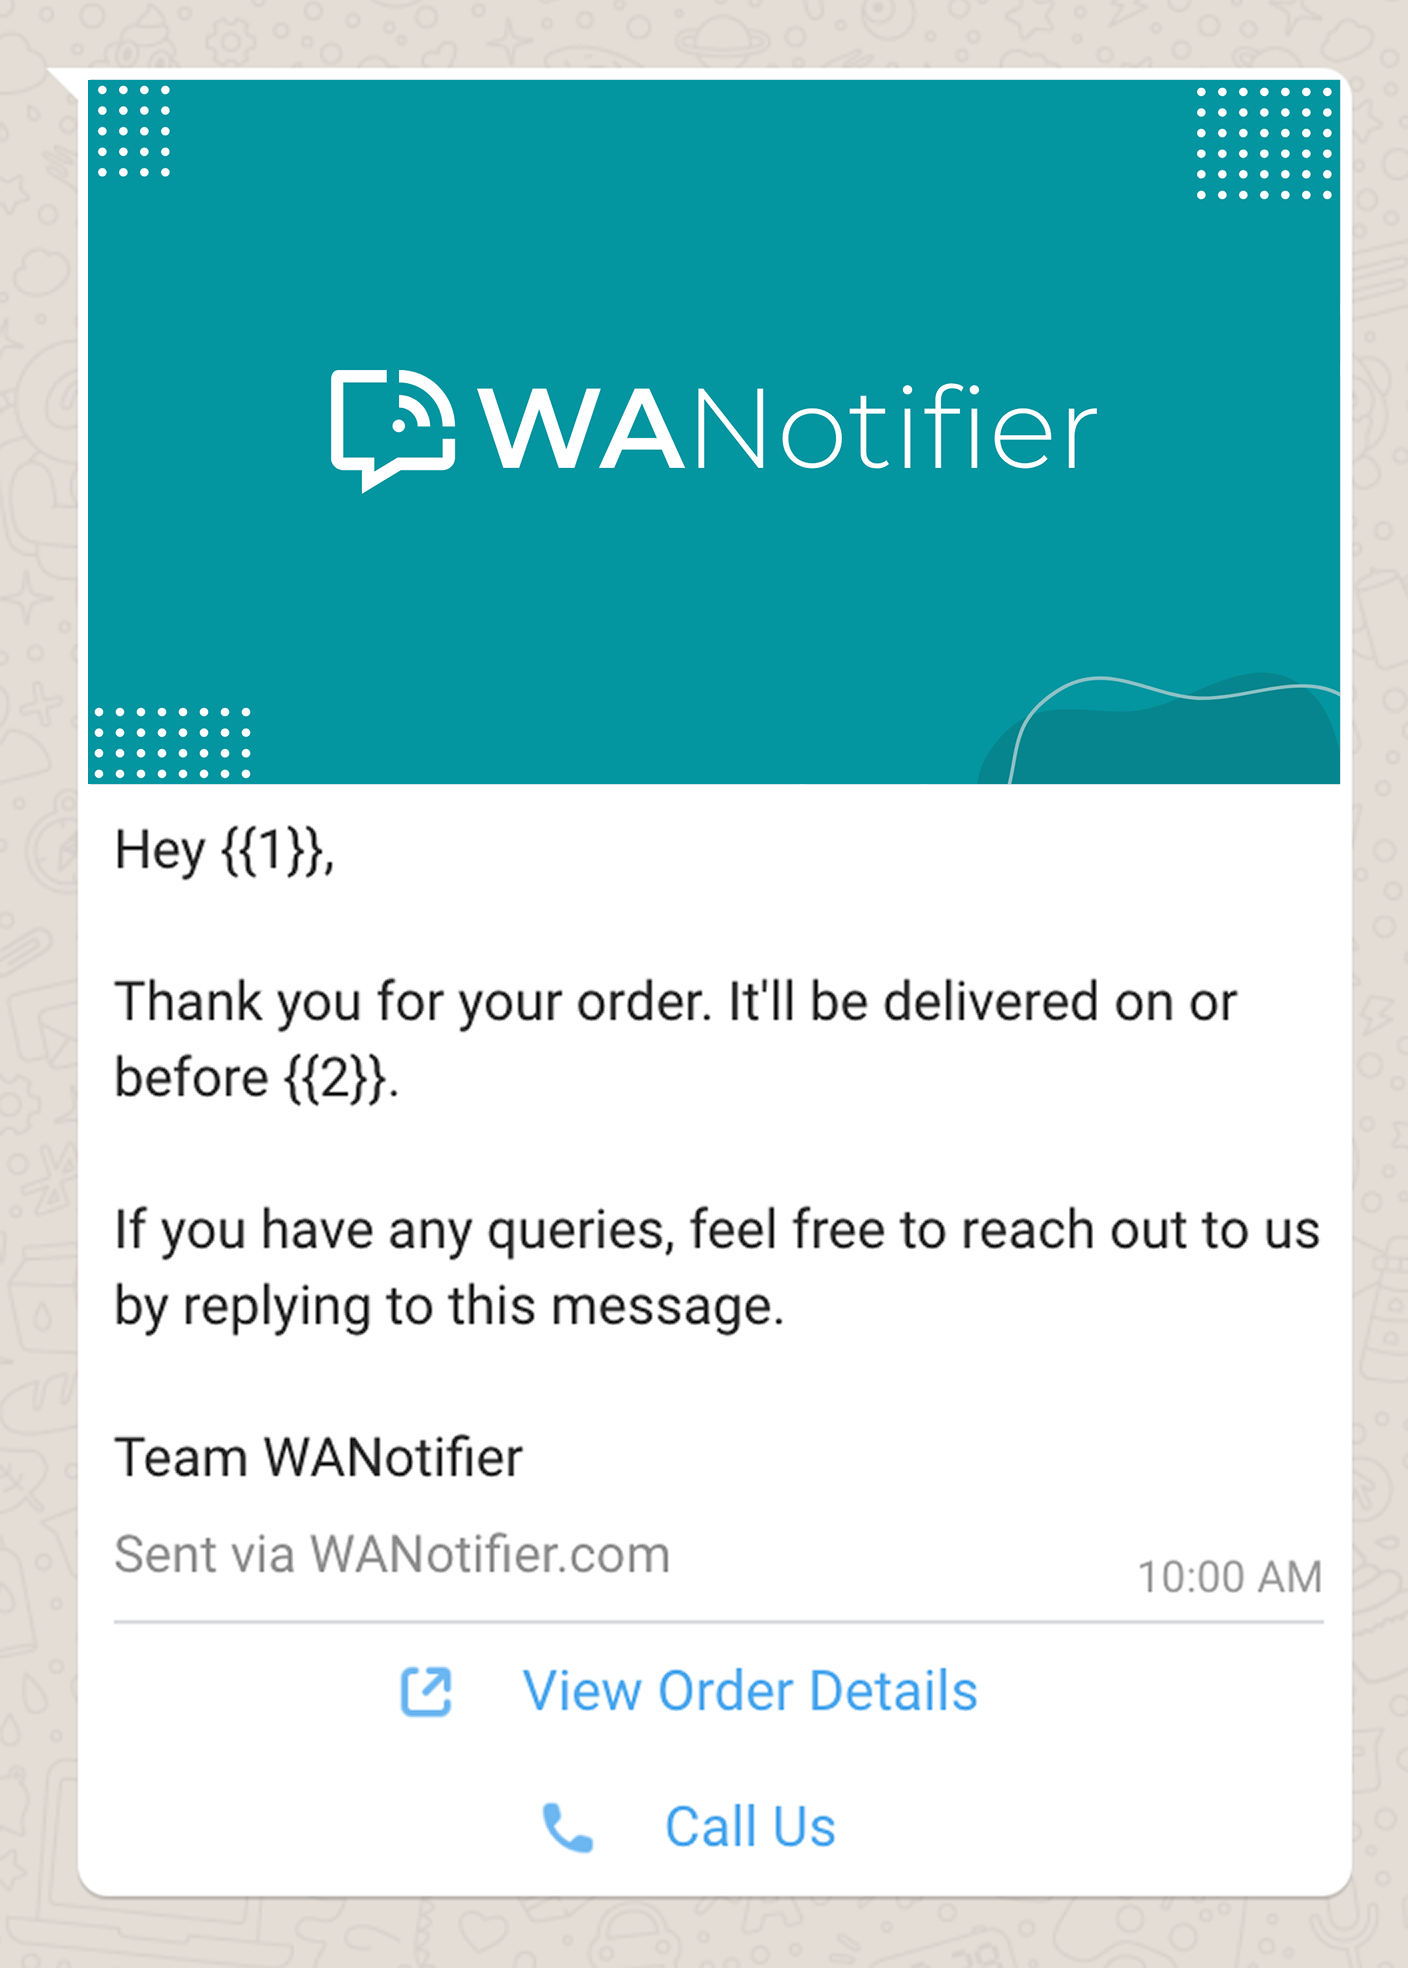
Now the next step is to create a new Message Template. You can think of message templates as email templates that you send to your email subscribers.
The only difference is that in the case of the WhatsApp API, you need to create and get the templates approved by WhatsApp before you can send them to your customers.
Here’s how to create a message template:
- Go to Messages Templates > Add New page on WANotifier to create a new message template that you want to send to your WooCommerce customer when the notification is triggered.
- You can create a template with static body text, or you can create templates with variables (think of variables as merge tags in emails).
- The difference here is that you can add variables like {{1}}, {{2}}, {{3}}, and so on in body text when creating the template, and map these variables with actual Data fields, which you enabled in your plugin, when creating a Notification, as shown in the next step.
- You can also add a separate text, image, PDF, or video to the template header, add footer text, and add buttons to the template footer.
- After making the template, you submit it for review to WhatsApp.
Note: Templates are manually reviewed by the WhatsApp team, so it may take between 30 minutes to 48 hours for it to get approved. Once that is done, you can use the template to send to your customers as shown in the next steps.
Step 3 – Add Your Contacts Manually or Bulk Import Using CSV file
The next step is to add your contacts. You can either add your contacts manually one by one or import all your contacts at once using CSV file import.
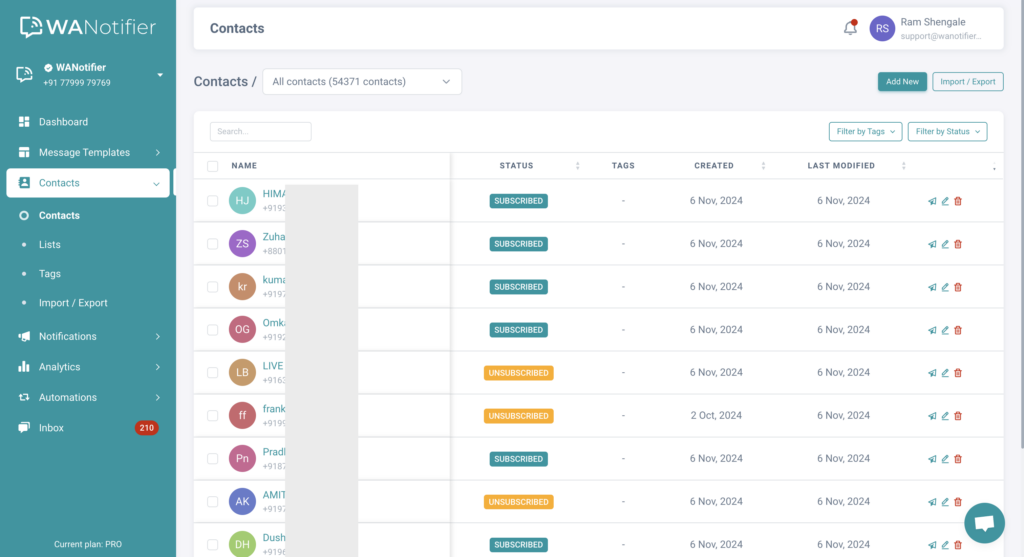
Follow the simple steps given below to bulk import your contacts:
- Create a CSV or XLS sheet with your contacts’ data, including first name, last name, WhatsApp number and any additional contact attributes that you’d like to add to the contact.
- IMPORTANT: WhatsApp phone numbers must be added with country codes but WITHOUT the plus + sign. E.g. if the number is +91-98765-43210, you should add 919876543210.
- Make sure to format the phone number column as Text / Plain Text. See instructions on how to do that in Google Sheets and Microsoft Excel.
- Open the Contacts > Import / Export page. You’ll see the following screen:
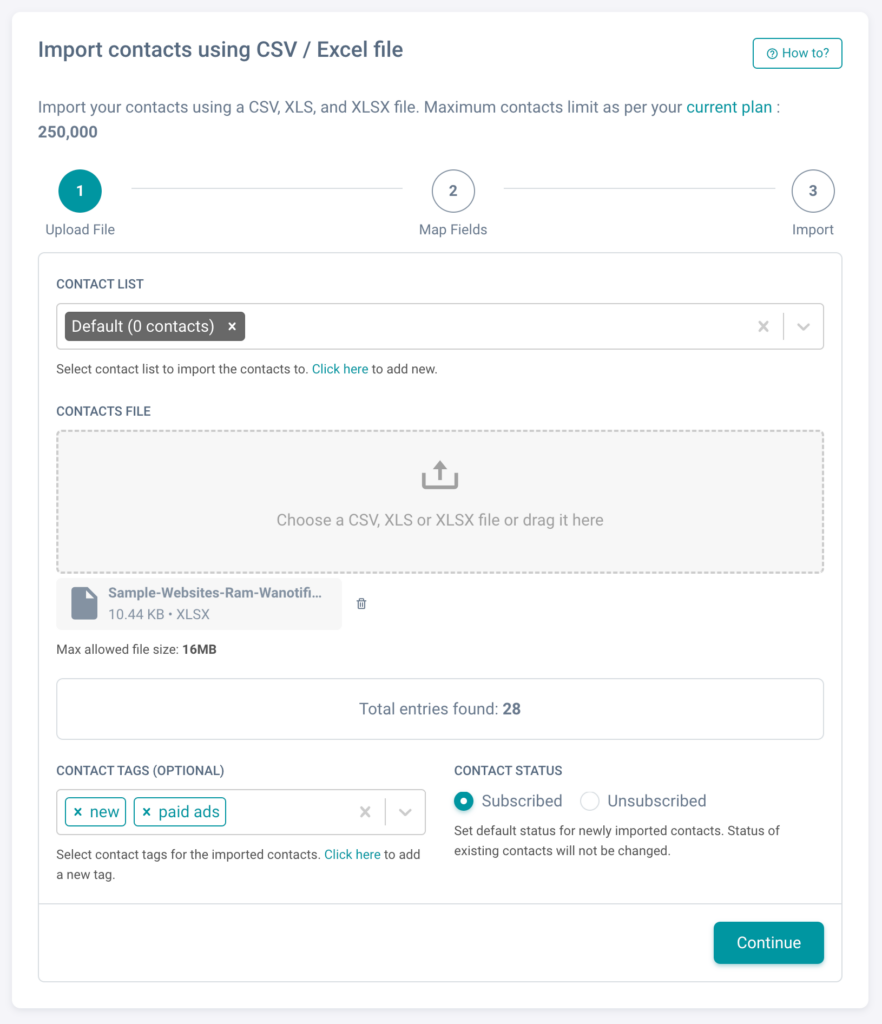
- Select the Contact Lists to which you want to import these contacts.
- Browse and select your CSV / Excel file.
- Select the default Contact status and Contact tags that you want to set for the imported contacts.
- Click on Continue to move to the next step.
- On the next step, you’ll see Sheet Columns and Sample Data from the sheet you uploaded. Map these columns to the respective Contact fields.
- If you have additional columns that you don’t want to import, you can leave them as it is and they’ll not be imported.
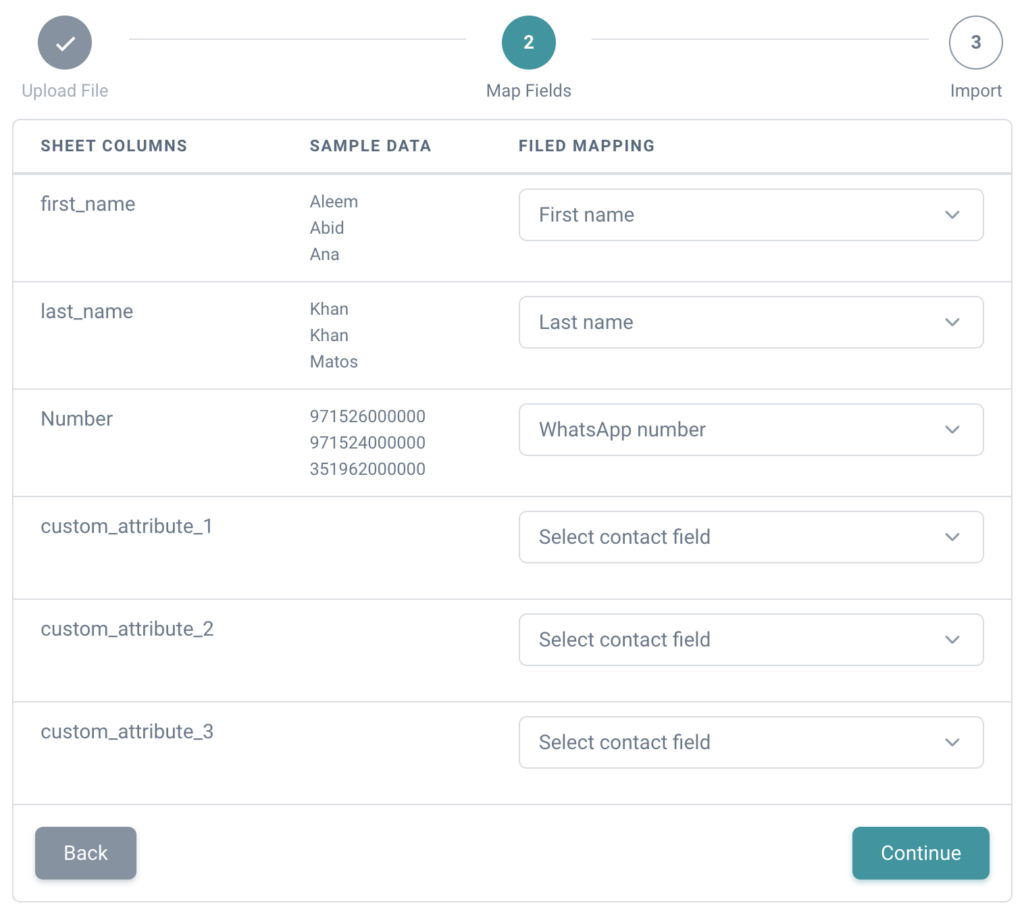
- After you’re done mapping your sheet columns with the Contact fields, click Continue, and that’ll start the import process!
That’s it. It’s that simple to import your contacts in bulk. You can also manually add your contacts or add them automatically from 3rd party websites and apps using our API feature.
Step 4 – Create and Send a Bulk Marketing Notification
The next and final step is to create a Notification. Think of Notifications as Campaigns. If you have used an email marketing software tool in the past to send marketing emails, the process is quite similar to that.
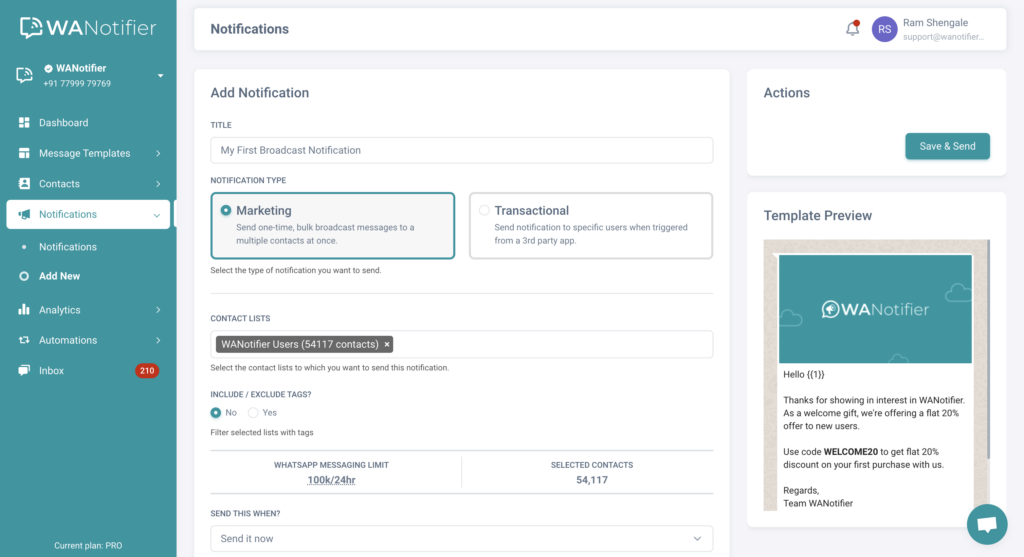
Here’s how to set up and send the Notification:
- Create a new Notification by going to the Notifications > Add New page.
- Select Notification type as Marketing.
- From the Contact Lists field, select the list to which you want to send the notification.
- Now select the Message Template you created earlier.
- If you created your message template with variables, you can map those variables with the available contact data fields from the Assign values to template variables section. You can also add a Fallback value in case the Value field might come empty.
- Note that if you created a template without variables, you’ll not see the Assign values to template variables section.
- To learn more about personalizing your template, you can read this article.
- After this, click on the Save & Send button to complete the process.
That’s it. This will send your WhatsApp message template in bulk to all the contacts present in your selected contact lists.
Sign up for WANotifier to connect with thousands of contacts in just a few clicks!
Best Practices
To make the most out of your WhatsApp marketing campaigns, it’s crucial to follow best practices that ensure your messages are effective and compliant with WhatsApp’s policies.
- Don’t SPAM: Always make sure that you have explicit permission from your contacts to send messages. Sending messages to non-opted-in users is strictly against WhatsApp’s policies and should be avoided at all costs.
- Segment your audience: Segment your contact list into multiple segments based on demographics, preferences, or behaviors. Personalized and targeted messages tend to have higher engagement rates.
- Craft clear and concise messages: Keep your messages short, professional, and relevant. Use buttons with a clear call-to-action (CTA) to guide recipients on the next steps.
- Respect timing and frequency: Avoid sending messages too frequently or at inconvenient times. Over-messaging can lead to audience fatigue or loss of interest, and the contacts may end up blocking you.
- Include an Unsubscribe system: Allow users to unsubscribe from receiving future messages from you. This demonstrates respect for their preferences and ensures compliance with privacy regulations.
- Monitor and analyze performance: Track message delivery rates, read rates, and user responses. Use this data to refine your messaging strategy and improve future campaigns.
By following these best practices, you can ensure that your bulk messages are well-received and effective in achieving your communication goals.
Conclusion
Sending bulk messages on WhatsApp has been a challenging task until the introduction of the WhatsApp API. You had to rely on unauthorized tools that were against WhatsApp’s policies and got your number banned. But with WhatsApp API and the correct tool like WANotifier, you can run your WhatsApp marketing campaigns on scale with peace of mind that you’re doing it the right way.
If you face these issues or any other issues, feel free to reach out to us using the chat widget on this page. We’ll be happy to help.
Sign up for WANotifier and send bulk WhatsApp messages without the risk of getting banned.
Frequently Asked Questions (FAQs)
How can I send 1000+ messages on WhatsApp?
You can send 1000+ messages on WhatsApp using the WhatsApp API. The WhatsApp API is officially provided by WhatsApp to allow businesses to scale their marketing on WhatsApp. Note that WhatsApp API can not be used directly, and you need to use 3rd party tools (like WANotifier) in order to consume the API to send the messages.
Can I send a bulk WhatsApp message without adding a contact?
This is a common question people ask who’ve earlier used the WhatsApp Business mobile app for sending bulk messages. Note that sending bulk WhatsApp messages using WhatsApp API works in a totally different way and is not related to the free mobile app.
With WhatsApp API, you need to first set up your number with a tool provider like WANotifier and then upload your contacts to their CRM in order to send the bulk messages. If you have used any email marketing software in the past, think of this like that, where you upload all your emails and then run email marketing campaigns.
If you do not want to use the API and are looking to learn how you can send WhatsApp messages without saving contacts, kindly refer to this article.
How can I send bulk files on WhatsApp?
When using the WhatsApp API, you need to create message templates first that are sent to WhatsApp for approval. These message templates support both text and media (including image, video, or document). So if you want to send any file to your contacts, you can create a message template with that file and then send this template to all your contacts.
Is WhatsApp API free?
No, WhatsApp API is the official API provided by WhatsApp and is paid. You need to pay for every message that you send to your contacts. You can learn more about this from our detailed article on WhatsApp API pricing.
Is it legal to send bulk WhatsApp messages?
WhatsApp is a private company, so sending bulk messages on WhatsApp is more of an authorization question instead of a legal question. In terms of authorization, WhatsApp has unauthorized use of bulk senders with the free WhatsApp and WhatsApp Business mobile apps. The only authorized way of sending bulk messages is to use the WhatsApp API, which is not free, and you need to pay per message.
In a nutshell, if you come across a message sender tool that does not charge you per message and asks you to scan a QR to set up your number, then that’s most probably an unauthorized bulk sender tool, and you should stay away from it. But if the tool mentions WhatsApp API, shows an onboarding flow with official Meta branding,g and asks you to pay per message as per the standard WhatsApp API pricing, like WANotifier, then that tool is authorized and you can use it.